 Schedule a Demo


Great entry Vadim. How does Windows behave when an entry of CTL has no matching certificate in a store? If I would like to manually switch between PKI hierarchies using CTL should I deploy the CTL as well as certificates files?
How to create Certificate Trust List (CTL) using PowerShell
In this post, I will explain how to create custom certificate trust list (CTL) using PowerShell PKI (PSPKI) module.
What is CTL?
In short, CTL is a Microsoft open format of portable certificate container based on PKCS#7 format. Although, PKCS#7 already is a simple container for certificate, CTL provides several useful features:
- Name each list for better discoverability;
- Provide versioning;
- Add X.509 attributes to each certificate;
- Set custom validity for entire list;
- Restrict usages (purposes) for all certificates in list;
- Digitally sign the list.
Using CTLs, you can logically group and distribute collections of certificates. Although, CTL is *trust* list, CTL can store arbitrary certificates, root, intermediate and cross certificates. Depending on store where CTL is installed, certificates in CTL are trusted or distrusted by operating system or application.
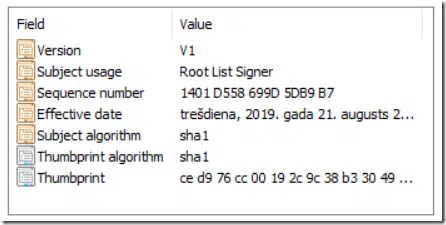
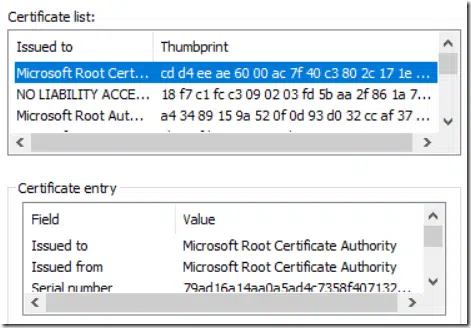
As said, CTL is often used to logically group multiple certificates for specified purposes and trust/distrust for specified duration. Instead of managing multiple separate certificates, you manage only single container. Microsoft uses CTL to distribute a list of trusted root certificates which are members of Microsoft Root Program, explicitly distrusted (compromised) certificates:
Create new list
Sysadmins.PKI.dll library (part of PSPKI module) provides a set of APIs to generate arbitrary CTL. X509CertificateTrustListBuilder is a base class to build CTL. Use available properties to configure the list. Actual certificates are added to Entries collection in a form of X509CertificateTrustListEntry objects. Here is an example script that creates a trust list which is valid for
Import-Module PSPKI
# instantiate trust list using default constructor
$builder = New-Object SysadminsLV.PKI.Cryptography.X509Certificates.X509CertificateTrustListBuilder
# provide version and name. Both are optional
$builder.SequenceNumber = 5
$builder.ListIdentifier = "My custom trust list"
# restrict list to client and server authentication
[void]$builder.SubjectUsages.Add("1.3.6.1.5.5.7.3.1") # server authentication
[void]$builder.SubjectUsages.Add("1.3.6.1.5.5.7.3.2") # client authentication
# set validity for 5 years:
$builder.NextUpdate = [datetime]::Now.AddYears(5)
# add certificate entries in the list
# for this example purposes we will add 10 certificates from CA store:
$certs = Get-ChildItem cert:\currentuser\ca | select -First 10
# convert X509Certificate2 objects to X509CertificateTrustListEntry
$certs | ForEach-Object {
    # use SHA1 to reference certificate in the list
    $entry = New-Object SysadminsLV.PKI.Cryptography.X509Certificates.X509CertificateTrustListEntry $_, "sha1"
    $builder.Entries.Add($entry)
}
if we run this piece of code, we will get this in $builder variable:
PS C:\> $builder

ListIdentifier : My custom trust list
SequenceNumber : 5
SubjectUsages  : {Server Authentication, Client Authentication}
Entries        : {E12D2E8D47B64F469F518802DFBD99C0D86D3C6A, C7ED7BF076120309F682577FE7B29A7593E9889C, AD898AC73DF333EB6
                 0AC1F5FC6C4B2219DDB79B7, 94C95DA1E850BD85209A4A2AF3E1FB1604F9BB66...}
HashAlgorithm  : System.Security.Cryptography.Oid
ThisUpdate     : 09.01.2020 14:27:45
NextUpdate     : 09.01.2025 16:27:45


PS C:\>
Pretty simple! We can check created entries:
PS C:\> $builder.Entries
Thumbprint                               Attributes Certificate
----------                               ---------- -----------
E12D2E8D47B64F469F518802DFBD99C0D86D3C6A {}         [Subject]...
C7ED7BF076120309F682577FE7B29A7593E9889C {}         [Subject]...
AD898AC73DF333EB60AC1F5FC6C4B2219DDB79B7 {}         [Subject]...
94C95DA1E850BD85209A4A2AF3E1FB1604F9BB66 {}         [Subject]...
93E067E2FC976D8A53AA20F1A4E818D0F52779B4 {}         [Subject]...
92C1588E85AF2201CE7915E8538B492F605B80C6 {}         [Subject]...
8BFE3107712B3C886B1C96AAEC89984914DC9B6B {}         [Subject]...
83DA05A9886F7658BE73ACF0A4930C0F99B92F01 {}         [Subject]...
67090E77B40C7C40C1AB7733036B2EE4BCD178F0 {}         [Subject]...
56EE7C270683162D83BAEACC790E22471ADAABE8 {}         [Subject]...


PS C:\> $builder.Entries[0] | fl *

Thumbprint  : E12D2E8D47B64F469F518802DFBD99C0D86D3C6A
Attributes  : {}
Certificate : [Subject]
                CN=DigiCert SHA2 Assured ID CA, OU=www.digicert.com, O=DigiCert Inc, C=US

              [Issuer]
                CN=DigiCert Assured ID Root CA, OU=www.digicert.com, O=DigiCert Inc, C=US

              [Serial Number]
                04AE79606666901AB9C57FA66C5BDCCD

              [Not Before]
                05.11.2013 14:00:00

              [Not After]
                05.11.2028 14:00:00

              [Thumbprint]
                E12D2E8D47B64F469F518802DFBD99C0D86D3C6A


PS C:\>
CTL Signing
In order to allow Windows to trust the list signature, it must be signed using a certificate that is intended for “Microsoft Trust List Signing” (1.3.6.1.4.1.311.10.3.1) purpose. Now, we will sign the CTL using certificate:
# in my case, certificate with Thumbprint=40BE51BF3FCE811ADC714D2AEBD86A85A5EBDF24 is CTL signing cert
$cert = Get-Item Cert:\CurrentUser\My\40BE51BF3FCE811ADC714D2AEBD86A85A5EBDF24
# construct signer object from certificate and default hash algorithm
$signer = New-Object SysadminsLV.PKI.Tools.MessageOperations.MessageSigner $cert
# sign CTL
# last parameter is an optional collection of signing certificate chain
$ctl = $builder.Sign($signer,$null)
And voilà:
PS C:\> $ctl

Version          : 1
SubjectUsage     : {Server Authentication, Client Authentication}
ListIdentifier   : My custom trust list
SequenceNumber   : 05
ThisUpdate       : 09.01.2020 16:27:45
NextUpdate       : 09.01.2025 16:27:45
SubjectAlgorithm : System.Security.Cryptography.Oid
Entries          : {E12D2E8D47B64F469F518802DFBD99C0D86D3C6A, C7ED7BF076120309F682577FE7B29A7593E9889C, AD898AC73DF333E
                   B60AC1F5FC6C4B2219DDB79B7, 94C95DA1E850BD85209A4A2AF3E1FB1604F9BB66...}
Extensions       : {}
RawData          : {48, 130, 57, 30...}


PS C:\>
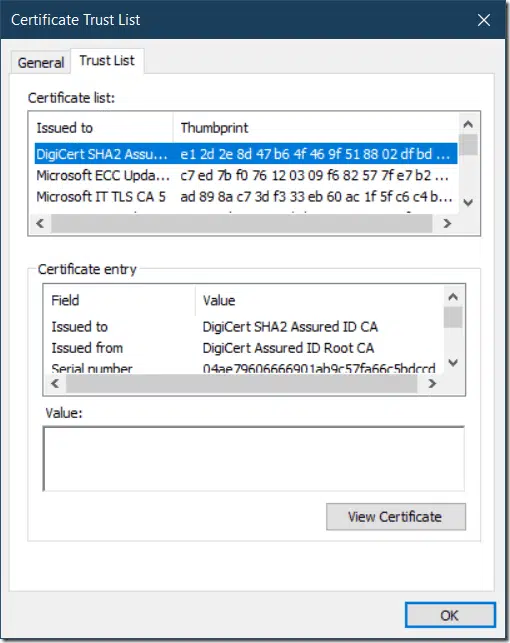
if we call $ctl.ShowUI(), we will see CTL object in Windows UI:
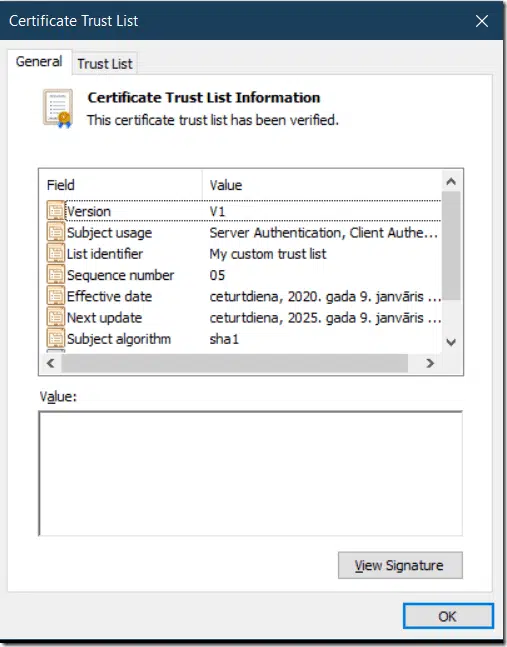
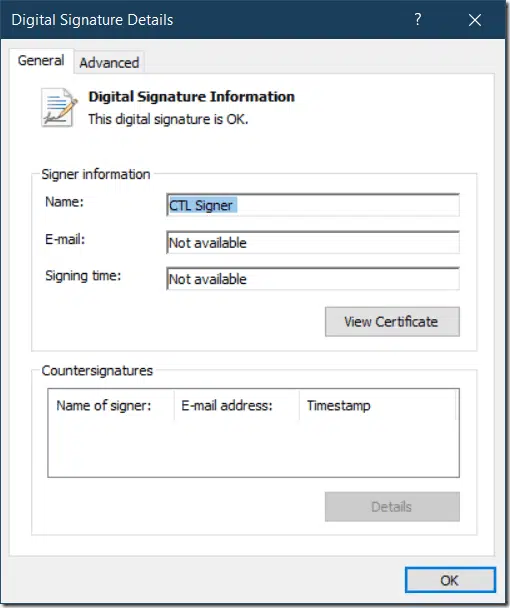
One more step is left. Last image shows that CTL is signed and not time-stamped. This means, that CTL will expire as soon as expires signing certificate. So, we add timestamp to signature:
$ctl.Addtimestamp("", "sha256")
call $ctl.ShowUI() again to show changes in signature:
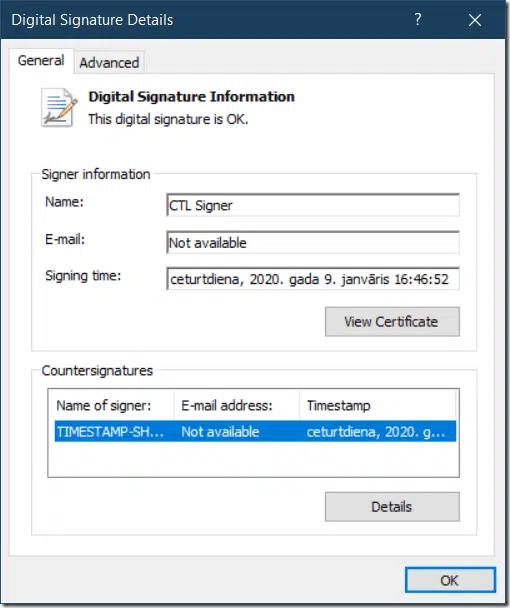
now, CTL is signed and timestampted and won’t expire after signing certificate expiration.
Note: you can timestamp only signed CTL.
Edit existing CTL
Another neat feature in CTL builder is that you can edit existing CTL object. In order to do this, use the following builder constructor:
PS C:\> $builder2 = New-Object SysadminsLV.PKI.Cryptography.X509Certificates.X509CertificateTrustListBuilder $ctl
PS C:\> $builder2

ListIdentifier : My custom trust list
SequenceNumber : 5
SubjectUsages  : {Server Authentication, Client Authentication}
Entries        : {E12D2E8D47B64F469F518802DFBD99C0D86D3C6A, C7ED7BF076120309F682577FE7B29A7593E9889C, AD898AC73DF333EB6
                 0AC1F5FC6C4B2219DDB79B7, 94C95DA1E850BD85209A4A2AF3E1FB1604F9BB66...}
HashAlgorithm  : System.Security.Cryptography.Oid
ThisUpdate     : 09.01.2020 14:27:45
NextUpdate     : 09.01.2025 16:27:45


PS C:\>
When you pass existing CTL to builder, all data (except signature) is copied from existing CTL to builder. Modify CTL contents as necessary and sign it again.
Final words
As you see, CTL building was never that simple in PowerShell. Given that APIs are built using .NET, same behavior is used in any other .NET language (C#/VB.NET/others).
Related Resources

Comments
-
-
yes, you should include certificates in CTLs. It is always a recommended practice.
-
-
Sorry for this message. I’m really appreciated for your blog. But I still have a question for this blog, when I execute in Powershell (Administrator) this command “$ctl = $builder.Sign($signer, $null)”, it shows “Exception at call to two parameters Sign(), Cannot find the certificate and private key for decryption”. I use a self-signed certificate for $cert. I do not know what I did wrongly, if you have time, can you tell me what should I do? Can I use a self-signed certificate for $signer’s $cert?
-
Looks like your certificate doesn’t have private key to sign the CTL.
-
Thank you!
-
-
-
Hello vadims,
do you have some pointer for “Microsoft Trust List Signing” template configuration ?Before changing the default provider from “Legacy CSP” to KSP i got the “Exception calling “SignData” with “2” argument(s): “Invalid algorithm specified” when running “$ctl = $builder.Sign($signer,$null)” Now I can sign it, but i have “This certificate trust list cannot be verified. The certificate that signed the list is not available for validation” in the $ctl.ShowUI() But the CTL cert looks fine and come from the domain CA. I’ve try to add the CTL cert within the list with all the chain cert but without success…
Is it really the only way to use “Certificate Trust List” for deploying certificat by GPO for only a group of AD Users? Adding Root looks straightfoward with the GPO “Certificate Trust List Wizard” but we can’t add Intermediary CA (we got the “Only self-signed certificates are added to the CTL” error ) and we need to deploy both a Root and a CA to a AD user Group by GPO.
It’s like they work on that feature, added Root deployment.. and then they stop because maybe this was a bad idea to permit cert deployment by user group!
-
I’ve succeded to create a “certificate Trust List” with the GPO wizard !! but when i’m trying with your PS script, it’s not working. If I export the .stl from the GPO and import it with $ctl = Get-CertificateTrustList -Path C:\Temp\out.stl and then doing $ctl.ShowUI() this show the list perfectly! ( This certificate trust list has been verified). I can’t create the list by PowerShell with your cmdlet but I can with the mmc.
If im creating the $builder construct from this import :
$ctl = Get-CertificateTrustList -Path C:\Temp\out.stl
$builder = New-Object SysadminsLV.PKI.Cryptography.X509Certificates.X509CertificateTrustListBuilder $ctl
$cert = Get-Item Cert:\CurrentUser\My\04DB27ED1657B616044D3B18FA6B8B34DDD8220F # the same CTL cert used with MMC wizard
$signer = New-Object SysadminsLV.PKI.Tools.MessageOperations.MessageSigner $cert
$ctl = $builder.Sign($signer,$null)Now the UI show (This certificate trust list cannot be verified. The certificate that signed the list is not available for validation)
Is there a path or something i need to configure for PowerShell to find it?
Thanks
-
That’s strange. At the time of posting the example was valid. However it fails with same reason for me now. I need to investigate what was changed.
-
Thank a lot for your time! There is really not a lot of information on the mecanism about all that. yeah we know it’s a list of certificate you trust.. but c’mon ! I had to buy me a 2003 book (Windows Server 2003 Security Infrastructures – Core Security Features – Jan De Clercq) for getting a little bit of “implementing” information !
15.5.2 CTL certificate chain processing
A special case of certificate chain processing is Certificate Trust List
(CTL) certificate chain processing. CTLs are signed lists of trusted root
CA certificates: They can only contain self-signed root CA certificates.
CTLs can be defined using Windows 2000 or Windows Server 2003 GPOs
and are downloaded to the Enterprise Trust container in an entity’s
certificate store. The Enterprise Trust container is not a trust anchor
container because its content is not considered trusted by default.
In order for a CTL and its content to be trusted, the CTL signing
certificate must be valid. This means that the CTL signing certificate
should pass the time, digital signature, formatting, and revocation
check. In order for the digital signature check to succeed, the CTL
signing certificate’s certificate chain should contain a certificate that is
part of the Trusted Root Certification Authorities container.In your exemple you are addin the first 10 Intermediate certificate ($certs = Get-ChildItem cert:\currentuser\ca | select -First 10). Is it real they can only contain self-signed root CA certificates ?
That’s why I want to use your PowerShell method. Because I can’t create a CTL with CA cert from the MMC console, but apparently, you can programatically..
-
In fact, CTL can store any kind of certificates. The difference is in the purpose. In order to deploy multiple trusted root CA certificates, then only root certificates shall be included in CTL. CTL is simply a signed container of a bunch of certificates. The rest is up to its purpose and application.
-
-
-
-
-
Have you found the error finally? (UI showing (This certificate trust list cannot be verified. The certificate that signed the list is not available for validation)
-
I’m sorry, but not yet.
-